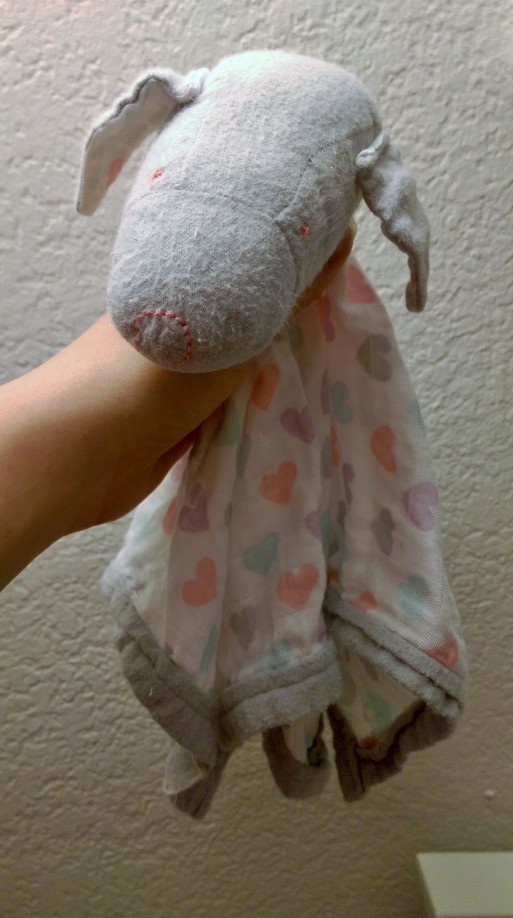
My definition of motherhood is doing all the things you swore you would never do. Take a lovey, otherwise known as a glorified security blanket. Previously, I thought they were dumb and a bit disgusting and taught children bad habits. And what did I just make my daughter? You guessed it. A lovey. She is an amazing sleeper, but I have read that loveys help babies sleep even better because it helps soothe them to sleep. I was too scared to (and you kind of are not “supposed” to) put anything in her crib besides her and her pacifier for the first 6 months, but now the chance of SIDS is greatly reduced and now is when babies actually learn how to fall asleep (and struggle doing so). So lovey time it was! Yes, I could have gone and bought one, but most on the market are made of really thick, usually synthetic, material, and I was a little too scared because you know, mom guilt is real. So I made my own out of 100% cotton super light muslin and flannel. I liked the look of the aden + anias dog lovey, so I used that as my inspiration.

Materials:
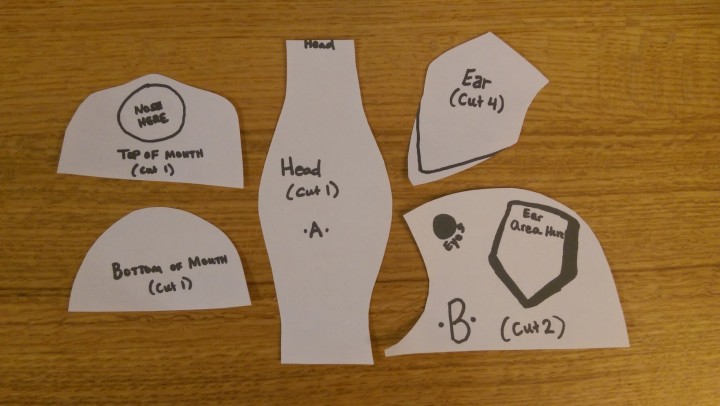
- Dog (or other animal) head pattern
- 1/2 yard main fabric (I chose 100% cotton swaddle muslin)
- 1/4 yard accent fabric (I chose 100% light flannel)
- Stuffing (I couldn’t find cotton stuffing so I bought 100% cotton batting and shredded it)
- Matching thread
- Sewing machine, scissors, hand stitching needle
Directions:
- Gather materials. I found a free cute stuffed dog pattern here and just used the head portion. The material, batting, and thread I got at JoAnne’s in the children’s fabric section. Just as a warning, I had never worked with the baby muslin and flannel before and it was very delicate and easy to tear holes in, so if you don’t mind having a thicker material it would make it a lot easier.
- Cut out your stuffed animal head pattern. I printed mine onto regular printer paper and it worked just fine. I also had to shrink it a bit, I did this by cutting it down to about a centimeter less than the inside sewing lines. I also tweaked it a bit, making the ears a bit longer because, well, I just think long ears are adorable. I then pinned it to the grey fabric and cut out my pieces. If you would like to have accent fabric under the ears like I did, make sure you cut two of the ear pieces out of your main fabric.
- Sew your head together based on pattern instructions. I had never made a stuffed animal before, so this part was a bit challenging because I was learning and making mistakes as I went. Also, the flannel kept tearing holes in my seams. Instead of sewing the head into a stuffed animal body, I just sewed the head closed. I did this at 2am because I was unwilling to stop until this beast was finished, so my hand stitching was not the greatest, but I figured it would be against the blanket and so it didn’t need to be perfect. Also, add a face on your head if you like. I was scared of safety eyes or fabric markers, so I decided to take the same pink accent thread and hand sew a little circular nose and little stars for eyes.

It turned out pretty unsymmetrical, but for my first time I guess I can’t complain (too much anyway). 
The Frankenstein bottom seam. I am embarrassed to show this to you, but I am doing it so you don’t feel bad at however yours turned out because mine was worse! - Cut your blanket fabric. I didn’t want my blanket to be too small or too big, so I read that the aden + anias blanket is 16 inches by 16 inches so that is what I decided to make mine. If you would like yours bigger, feel free! The great thing about muslin swaddle fabric is the design is on both sides and it is intended to only be a single layer, so I just cut one. However, if you want your blanket to be dual layered, you could cut a second square out of the main fabric, accent fabric, or a different one altogether!
- Cut out your accent borders. I decided I wanted an inch showing on both sides, so I cut mine 2.5 inches thick, that left me a quarter of an inch on both sides to fold under.
- Sew your borders to your blanket. If you know how to do one continuous fancy edge, you are a better sewer than me! I don’t and didn’t feel like learning, so I sewed my side borders on first, then my top and bottom, just so the overlapping was matching. I placed my border so it was even on both sides, then I folded under the edges 1/4 of an inch and pinned in place. Then I took my accent pink thread and sewed my edges down with my sewing machine.

The blanket laying flat. - Sew your head to the center of your blanket. I took a hand stitching needle with white thread so it would blend in. Then I sewed a circle around the base of the head attaching it to the blanket. I went around twice just to make sure it was secure, since I figured it would get picked up by its head a lot.

The underside of where I sewed the head on. - Wash. I washed my finished blanket with the fancy baby soap before giving to her just to make sure it was free of any lingering chemicals or pollutants. I noticed the flannel seemed to shrink a bit, the head looks tighter than it did before I washed it, so you may want to wash it before you make your head.
- Give to your baby and hopefully they love the crap out of it! These also make great shower gifts, and once I get better at making stuffed heads this project would only take me a few hours, so it really isn’t so bad. You could also make a couple, because, you know, babies are gross. But so dang cute!