
This is my sweet daughter’s first Halloween, and I have vowed to make as many of her (and our) Halloween costumes as she will let me (once she hits a certain age she might rather die than get caught in a DIY, and I will hold back my tears when we get there). I also am obsessed with group costumes, and making costumes that are unique that you don’t see every day.
Is it sad that I started planning my daughter’s first costume when she was still in utero…in June? I blame bed rest for that. I vowed though that no matter how much googling I did, I would not let myself start making her costume until September. Guess what I did September 1st?
I wanted something girly, but not in your face girly. I also factored in her age, and knowing that she would be almost 4 months, I figured we would be babywearing her, so obviously I wanted to make some type of wearing costume for the two of us. There are a ton of cute ideas for babywearing out there (just google “babywearing costumes”), but I wanted to make something I haven’t seen before. This was the picture that inspired it all:

I mean, isn’t that the cutest dang thing you have ever seen?! Then it hit me, I needed to make a babywear ghost costume!!
Supplies:
- White tulle (I bought a roll of 6in x 100 yards and used most of it)
- Black felt (or fabric could work too)
- Silver glitter fabric paint (optional, but adds a level of cuteness)
- Thin white ribbon (have seen this done with white elastic too)
- Scissors, tape measure, hot glue gun, blue tape (not essential but SURE helped)
- Baby carrier (backpack type is easier than sling type, also extra points if it is black)
- Black clothes for the person wearing the baby and white clothes for the baby

Directions:
- Gather your supplies. I got the first four things on the list above at Michael’s for under $20. The rest I already had at home.
- Measure how wide and long you want your costume to be. I put baby in the carrier and then measured first from one side of the carrier to the other (where I wanted the tulle to go), then I measured all the way around so I knew how long to cut my ribbon. I then measured how long I wanted the skirt to go. I wanted the carrier to be completely covered, but I didn’t want it so long that it was more obnoxious than it already was. For me, it was 15 inches wide of tulle, 25 inches all the way around, and 15 inches long. Yours will vary based on how big your baby is, but those numbers above are a good starting off point.
- Cut your tulle. And when you think you have enough, double that. And then you still probably don’t have enough but it is a good start. You can buy tulle by the yard like fabric, but if you can find it by the spool like I did, I highly recommend it. However long you want your tulle to be, double that number and that is how long you need to cut each piece of tulle. To make cuts easy, fast, and identical, I taped the measuring tape down to the table, making sure the 30 inches was visible since that is what I would be cutting to. Then I rolled out the tulle, held the end to the end of the measuring tape, and cut it at 30 inches. Then repeat. And repeat it a million more times.

- Cut your ribbon. Ribbon (or elastic) is what the tulle will be attached to and will wrap around your child. I needed 25 inches of ribbon to wrap all the way around, so I added 5 more inches (to tie at the end) and then cut my ribbon.
- Measure out where you want the tulle to go on your ribbon. I laid out the cut ribbon on my table, and then taped down the ribbon 17 inches apart (how wide I want my tulle to go) in the middle of the ribbon. This step is not essential, but it helped in two ways. It kept the ribbon in place, and it showed me where to start and stop my tulle tying.

- Knot the tulle strips on the ribbon. Take one piece of tulle and fold it in half width wise so my tulle piece was 6 inches wide and now it is 3 inches wide. Then fold the piece in half length wise so the piece goes from 30 inches to 15 inches. With the looped end at the top, layer the tulle under the ribbon taped to the table.
 Then open the loop at the top, and thread the bottom ends through the loop.
 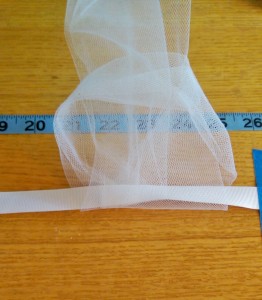 Pull the ends tight until the loop becomes a knot.
  Repeat this process until your ribbon is filled between the two pieces of tape. I wanted my skirt to be very full, so I pushed the knots as close to each other as I could get. If you want it less full, you don’t need them as tightly packed. At the end, if you have any tulle pieces that are longer than the rest and stand out, simply cut them off with your scissors.
- Draw and cut out your ghost face. I wanted a pop of fun so I outlined the face with silver glitter paint, which I think made it easier for me in the end. I had fun and drew a bunch of different eyes and mouths in the black felt with the fabric paint. I also drew a little “BOO!” piece I wanted to add to her headband. I waited for the paint to dry, then I cut out the pieces and played mix and match until I found a combo I liked.

- Hot glue gun the face onto your tulle in the center.
- BONUS: If you want to make a cute headband like mine it was really easy. I created two tulle bows with my leftover tulle, one a little smaller than the other. Then I took a small piece of tulle, wrapped it into a rope, and tied the smaller bow on top of the bigger bow, and then tied it to the middle of a long piece of tulle (which will later become the headband). I then hot glued the “BOO!” I made earlier to the center of the bow.
- Wear your costume!! Put your baby wearing white clothes into the carrier. Wrap the skirt around the top of the carrier and tie a bow around the back of the baby. If you feel the skirt isn’t secure you can safety pin it to the carrier, but we seemed to be fine without them. Then I put the bow on top of her head, wrapped the tulle around the sides and tied it in a bow on the back of her head. To finish your outfit, have the person wearing the baby wear black! This way it looks like the ghost is “floating.”


Alternatives: If you wanted to make this for a boy it would be easy. You could make the face scary instead of happy, omit the silver glitter paint, and instead of a bow, get a white beenie and glue the BOO! to it. Instead of tulle, you could even use white strips of fabric to make it less “tu-tu-y.”

And not to brag or anything, but we were the star of the show at the pumpkin festival we went to!! If there was a costume contest, we totally would have won!

this is such a cute costume !!!! Your daughter looks adorable !!
Thanks so much!
I love this, I’m stealing the idea for me and my 9 month old little girl for this Halloween!!
I’m so glad! Let me know how it goes!