

At the middle school I teach we have a big fundraiser we do every year. It is too complicated to explain, but the theme of the fundraiser is “ducks” and we dress in yellow and orange and make a big deal about it. I somehow got the brilliant idea of wanting to make some type of duck themed garment, and came up with the idea of a duck scarf. I kind of had an idea in my head that I wanted to try, so I started googling for ideas and inspiration. After searching and not finding what I wanted, I decided to just jump in and try to create what I saw in my mind.
Overall I am very happy with the result. Yes, these scarves are kind of tacky with their yellow and orange (which I wanted). But you could take the method and use neutral colors to create a really fashionable scarf, or you could make it with the colors of your favorite team and wear it on game days.
Materials:
- Nine different flannel fabrics, each 1 yard long.
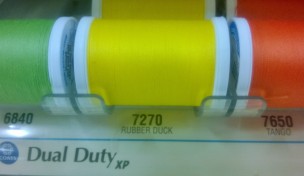
Note the name of the thread I used. - Fabric scissors
- Ruler or tape measurer
- Pencil or fabric pen
- Sewing Machine (HIGHLY recommended)
- Matching thread (I used 1 1/2 rolls)
- Fabric pins (I used about 8)
- Safety pins (I used 3)
- Sewing Needle

1. Pick 9 flannel fabrics: I shopped at Jo-Anne Fabric and Craft Store which had everything I wanted. I first wanted to do it with fleece so I didn’t have to sew anything, but after feeling the material I realized it was too thick. Then I moved to flannel, which had the softness of the fleece but it was thinner and easier to maneuver. Jo-Anne had a nice variety of flannel with every solid color I could want and a lot of patterns too. Since the scarves were supposed to be duck themed, I really wanted to find a print with actual ducks on them. I could only find one duck print in the entire store (I assumed they would be all over the baby fabric section, but I guess rubber ducks are no longer cool), which was a pink fabric with dark brown writing. It didn’t really go with them color scheme I wanted, but I was desperate so I grabbed it and put it in my cart. I then picked 8 other fabrics to match the yellow/orange (with a hint of pink) theme. If you didn’t want to use 9 different fabric patterns, you could use 3 fabrics and either make each braid with the same fabric or make the same three fabric braid.
2. Cut the fabric (at the store): I asked for a yard (3 feet) of each fabric. One yard made 9 scarves. If you intend to make more scarves, get more. If you want less, get less. Usually the smallest amount of fabric you can buy is 1/4 of a yard. It is always better to buy more than you think you might need. I would rather spend a few extra bucks on fabric than have to drive back to the store and spend gas money and waste time.
3. Cut the fabric into 4in strips: I was afraid that after braiding the scarves would become too small, so I wanted the length of the scarf the longest piece of fabric I could. This meant that I laid the pieces with the cut fabric on the sides and the edge of the fabric on the top and bottom. Then laid the back of the fabric on top and measured four inches from the side. Then I drew little marks all the way down, each 4 inches from the edge. Then I carefully cut along the dotted line. It is OK if your line isn’t perfect. You will be folding the fabric and hiding all mistakes so if it is a little crooked or wavy don’t worry. Continue cutting 4 inch strips all the way down until you reach the end of your fabric. One yard of fabric made 9 strips with an inch or two of fabric left over. I highly suggest measuring and cutting each piece instead of measuring all of them and then cutting all of them, this way you don’t have to be so paranoid about cutting exactly perfect. Continue this process with ALL the fabric.


4. Fold and sew the strip edges: Get your sewing machine ready with the colored thread you want. I used a yellow that would match all my fabrics so I wouldn’t need to change the thread out. Then I took one strip and I folded the top edge of the fabric down so I could not see the white edges from the top (if you want to use an iron for this process you can, but I just pressed firmly with my fingers and it worked well enough). Then I folded one side halfway, and then the other side halfway, so they both met in the middle. Then I folded the strip in half with the colored fabric on the outside, and then pinned it in place. I continued this folding technique all the way down to the other end, and then folded the bottom edge like I folded the top. Then I used my sewing machine and with a simple straight line sewed all the way down the strip as close to the open edge as possible. This method hid the edges of the fabric, as well as thickened the strips so they became more rope-like. Continue with every strip until they are all complete.

5. Lay the strips out in the order you want your braids to be, then sew them together: Then I mixed and matched the strips and decided which strips looked best together. I laid them in order of which strips I wanted in which braids. I tried to keep similar colors and styles away from each other the best I could. Then once I was happy with the layout, I used the sewing machine to sew the pieces together side by side with one straight line across the top.


6. Braid Braid Braid!!: Braid the three pieces together that are on the furthest left. (Tip: It worked best that while braiding I folded the pieces rather than twisting them when I was pulling the bottom strip on top.) When I reached the bottom I pinned all three pieces together with a safety pin. Then I moved on to the middle three pieces, then the last three pieces, until I had three braids that were sewn together at the top. Then I braided all three pieces together so it turned into one large braid. Once I reached the bottom I ran them under the sewing machine so the ends were stitched together very similarly to how the top was stitched together.


7. Sew the two edges together: I tried to sew the two edges together with my sewing machine and it failed miserably. With all the braided flannel it was just way too thick. I ended up hand stitching each top strip to a corresponding bottom strip, putting at least two stitches per strip to make sure it was secure enough. I tried to hid the stitch in the existing stitches when possible. Make sure you put the top (or beginning) of the braids on top, they look a lot better and you can hide the bottom edges. Once each strip is secured, cut all the excess strips that are longer than the rest. Play with and tug the braids apart until the slack is equal all around the scarf.


8. Wear your super awesome scarf!!: Once I put the scarf on, I adjust braids again and then pull the bottom of the scarf down and the top of the scarf up so it lays flatter against my chest. Now strut your stuff and get ready for all the compliments!!

Final Verdict: Would I make these again? Begrudgingly I say “yes.” They took me way more time than I wanted (it took me from 5pm until 12am for 4 nights with very little breaks). I got much faster at using my sewing machine, grew a love/hate relationship with it, and understand how it works much better because I had to take it all the way apart a few times. I stabbed myself, cut myself, and cussed…a lot. But at the end of it all, I am happy with the way they turned out. If my kids are ever on some type of team (especially a winter sport where we have to sit outside to watch) I would think about making them in the team colors for the other parents. If I were to get married during the winter I would think about making these in the wedding colors for my bridesmaids (not to wear during the wedding, but just for fun). Or if I had more time on my hands I would think about making these in cute colors and selling them on Etsy (maybe one day).
Total price of fabric and thread: About $30 for 9 scarves, which makes it less than $4 a scarf.
Total time: About 20 hours to make all 9 scarves.

great idea, perfect for fall! love your blog as well! xx
Thank you so much!
Such a great idea! Awesome! 😉
Love,
Isabella
Thank you!