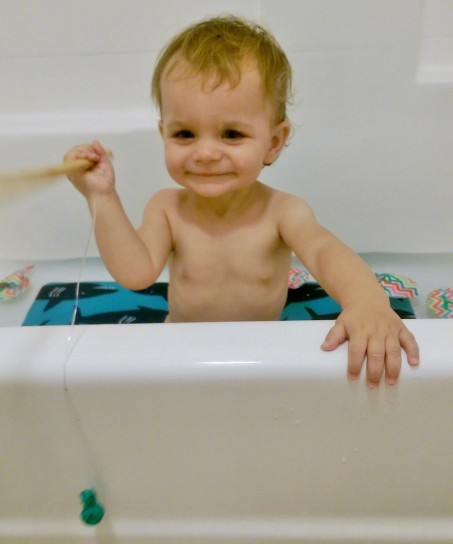
I have a large group of friends who all have babies born in the same birth month as my daughter. We are so lucky to have so many friends so close in age, but that also means I need to make/buy a lot of gifts in July! This year I decided to make a magnetic fishing game for the kids. It was really easy to make and they turned out really cute! My daughter loves playing with the fish, and the best part is the fabric is water resistant so it can be used in the bathtub!

Materials:
- Water resistant PUL fabric (I used 1/2 yard cloth diaper fabric to make 24 fish and had some fabric leftover)
- Magnets (enough for 1 per fish and 2 per fishing pole)
- Wooden dowel or stick
- Fishing wire/string
- Hot glue, or other type of waterproof glue
- Permanent marker
- Optional: Sewing machine and thread
- Optional: Fabric puffy paint
- Optional: Balloon or other waterproof material
Directions:
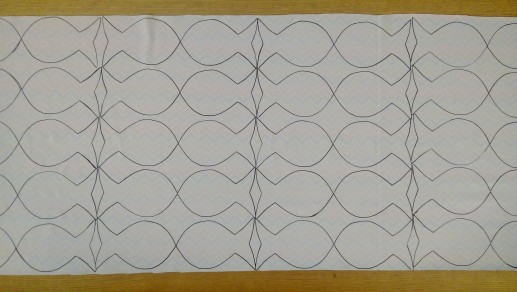
- Free hand draw a fish outline on a piece of paper or find an outline online, print it, and cut it out.
- Lay the fish stencil on the back of your fabric. Outline the stencil with your permanent marker. Flip the stencil and outline again on your fabric. This creates both sides of your fish. Continue doing this until you have as many fish as you desire.
- Cut the fish out and keep the two sides together.
- Using your waterproof glue, glue one magnet to the back side of one fish toward the mouth, making sure you leave about half an inch for closing the fabric pieces together.
- Lay a thin layer of your glue around the edges of the backside of your fish, and glue the other fish to the back.
- If you want to add extra support, sew a border around your fish. I chose to do contrasting colors to give it a pop of fun.
- To give an extra layer to the fishing game, I used fabric puffy paint to paint one letter on both sides of each fish, spelling out each child’s name. If you are more talented than me and want your fish to look a little nicer, you could cut out the letters in contrasting water resistant fabrics and glue/sew them on. I would have done this if I didn’t have to make so many!
- If needed, cut down the wooden dowel to be the proper length for your child. I was able to cut the dowels from Michael’s in half and they were the perfect length.
- I needed to use two magnets to make the magnetic power on the fishing pole strong enough, however based on what you buy you may not have to do this. I took one magnet, stuck a big dollop of glue on the top, placed the fishing wire in it, and then placed the second magnet on top. I felt this helped make sure the fishing wire didn’t come loose.
- I tried a lot of different ideas to make the magnet on the fishing pole look cute and like a little worm, but NONE of my ideas worked, so in a fit of rage I gave up and just wrapped a small balloon around the magnets and tied it with fishing wire. It does the job, but it isn’t as adorable as I was hoping. Oh well! If you come up with a better design, please let me know!
- I then cut off enough fishing wire and wrapped the other end around the end of the wooden dowel. Then I added a drop of hot glue to reinforce the knot.
- All done! Hope your little one enjoys their new fishing game! If they use the fish in water, make sure to lay them flat afterward for a few hours to dry. I usually just lay them over the edge of her toy bucket afterward.